Overview
This guide provides an overview of AWS DataSync, and a walkthrough for deploying a DataSync OVA template within a VMware ESXi Hypervisor environment.
TLDR;
- Download the DataSync Agent (OVA)
- Deploy the DataSync Agent
- Complete Network Configuration.
- Provide Nuclei with activation key
- Provide Nuclei with the LAN IP address and path of the network share
What is AWS DataSync?
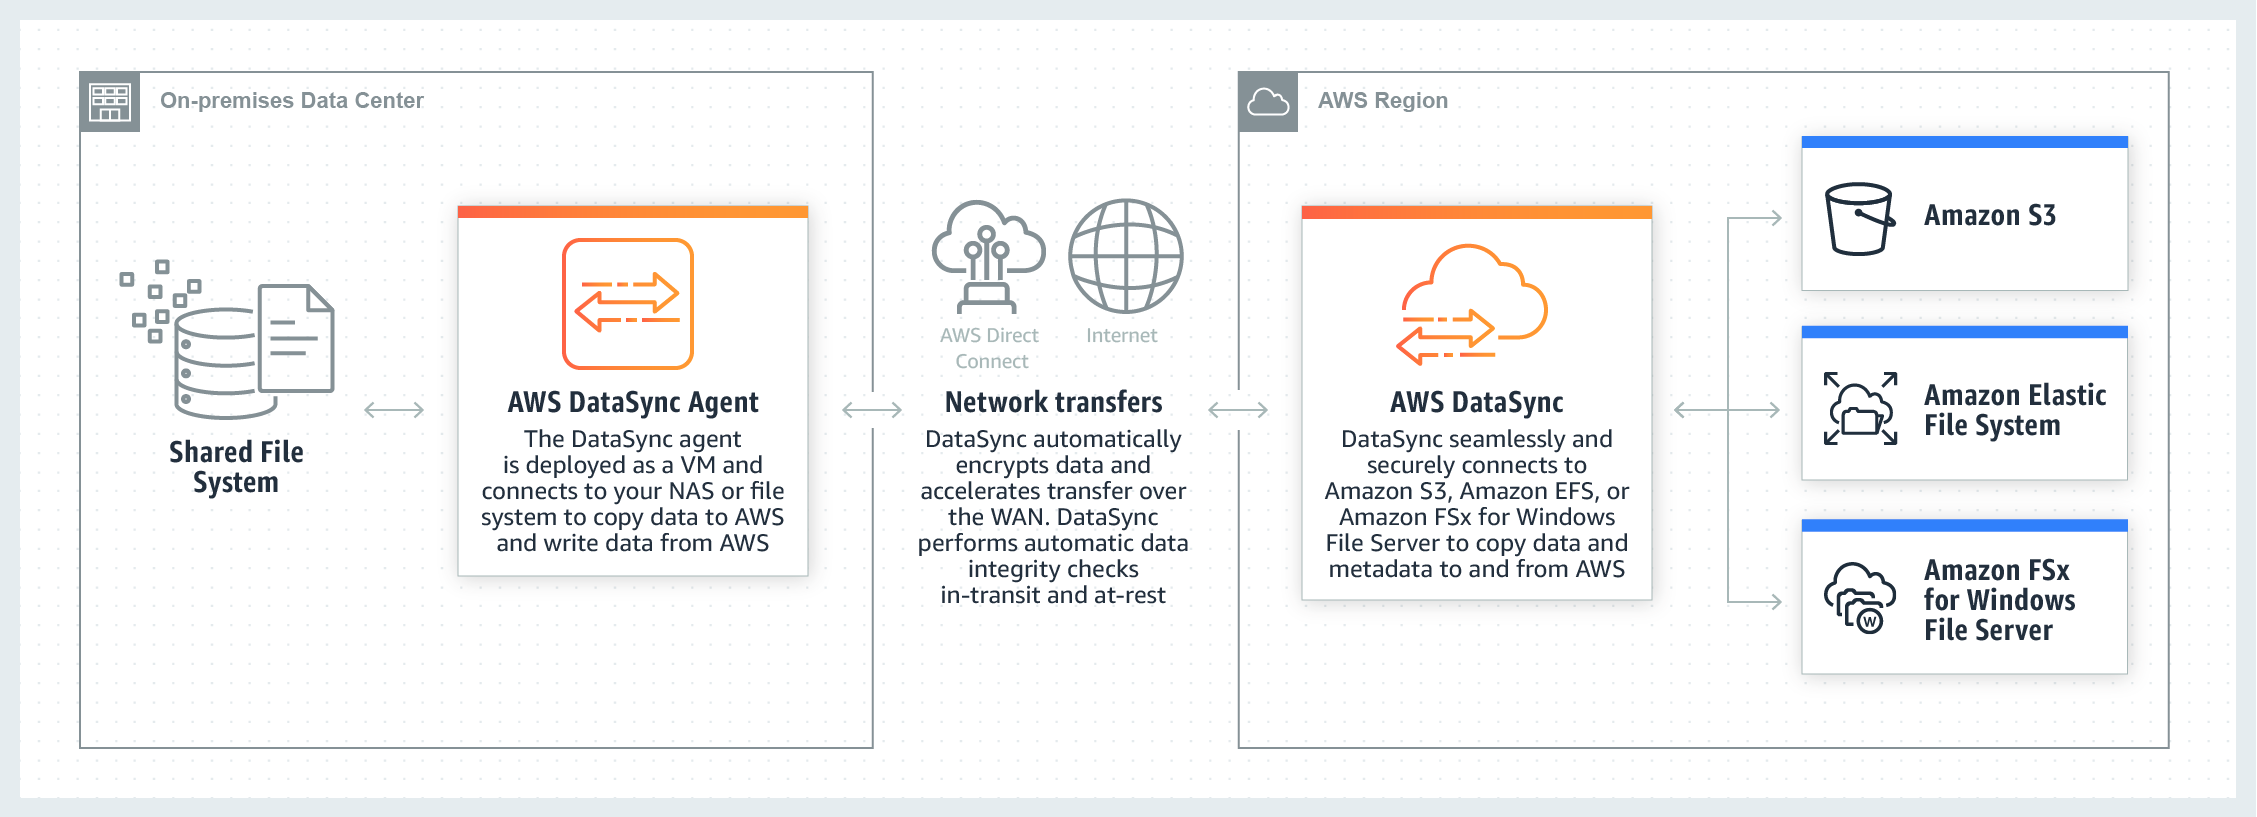
AWS DataSync makes it simple and fast to move large amounts of data online between on-premises storage and Amazon S3, Amazon Elastic File System (Amazon EFS), or Amazon FSx for Windows File Server. Manual tasks related to data transfers can slow down migrations and burden IT operations. DataSync eliminates or automatically handles many of these tasks, including scripting copy jobs, scheduling and monitoring transfers, validating data, and optimizing network utilization.
How does it work?
The DataSync software agent connects to your Network File System (NFS) and Server Message Block (SMB) storage, so you don’t have to modify your applications. DataSync can transfer hundreds of terabytes and millions of files at speeds up to 10 times faster than open-source tools, over the internet or AWS Direct Connect links. You can use DataSync to migrate active data sets or archives to AWS, transfer data to the cloud for timely analysis and processing, or replicate data to AWS for business continuity.
If you have on-premises systems generating or using data that needs to move into or out of AWS for processing, you can use DataSync to accelerate and schedule the transfers. It can help speed up critical hybrid cloud workflows in industries that need to move active files into AWS quickly, including video production in media and entertainment, seismic research in oil and gas, machine learning in life science, and big data analytics in finance.
More information on AWS DataSync is available here.
Prerequisites
DataSync Agent
DataSync runs on-premise as a virtual machine (VM).
DataSync supports the following hypervisor versions and hosts:
-
VMware ESXi Hypervisor (version 6.5 or 6.7) – A free version of VMware is available on the VMware website. You also need a VMware vSphere client to connect to the host.
-
Microsoft Hyper-V Hypervisor (version 2012 R2 or 2016) – A free, standalone version of Hyper-V is available at the Microsoft Download Center. For this setup, you need a Microsoft Hyper-V Manager on a Microsoft Windows client computer to connect to the host.
-
Linux Kernel-based Virtual Machine (KVM) – A free, open-source virtualization technology. KVM is included in Linux versions 2.6.20 and newer. AWS DataSync is tested and supported for the CentOS/RHEL 7.8, Ubuntu 16.04 LTS, and Ubuntu 18.04 LTS distributions. Any other modern Linux distribution might work, but function or performance is not guaranteed. We recommend this option if you already have a KVM environment up and running and you're already familiar with how KVM works.
-
Amazon EC2 instance – DataSync provides an Amazon Machine Image (AMI) that contains the DataSync VM image. For the recommended instance types, see Amazon EC2 Instance Requirements.
Virtual Machine Requirements
When deploying AWS DataSync on-premises, make sure that the underlying hardware where you deploy the DataSync VM can dedicate the following minimum resources:
-
Virtual processors – Four virtual processors assigned to the VM.
-
Disk space – 80 GB of disk space for installation of VM image and system data.
-
RAM – Depending on your configuration, one of the following:
-
32 GB of RAM assigned to the VM, for tasks to transfer EC2 instance types with up to 20 million files.
-
64 GB of RAM assigned to the VM, for tasks to transfer more than 20 million files.
-
Network Requirements
Network Requirements to Connect to your Self-Managed Storage
Deploy the DataSync agent close to the source file system to minimize the distance traveled using native protocols such as Network File System (NFS). Doing this ensures that files travel over the network using our purpose-built, accelerated protocol. It keeps the distance traveled by using native, slower protocols to a minimum, and significantly speeds up transfers.
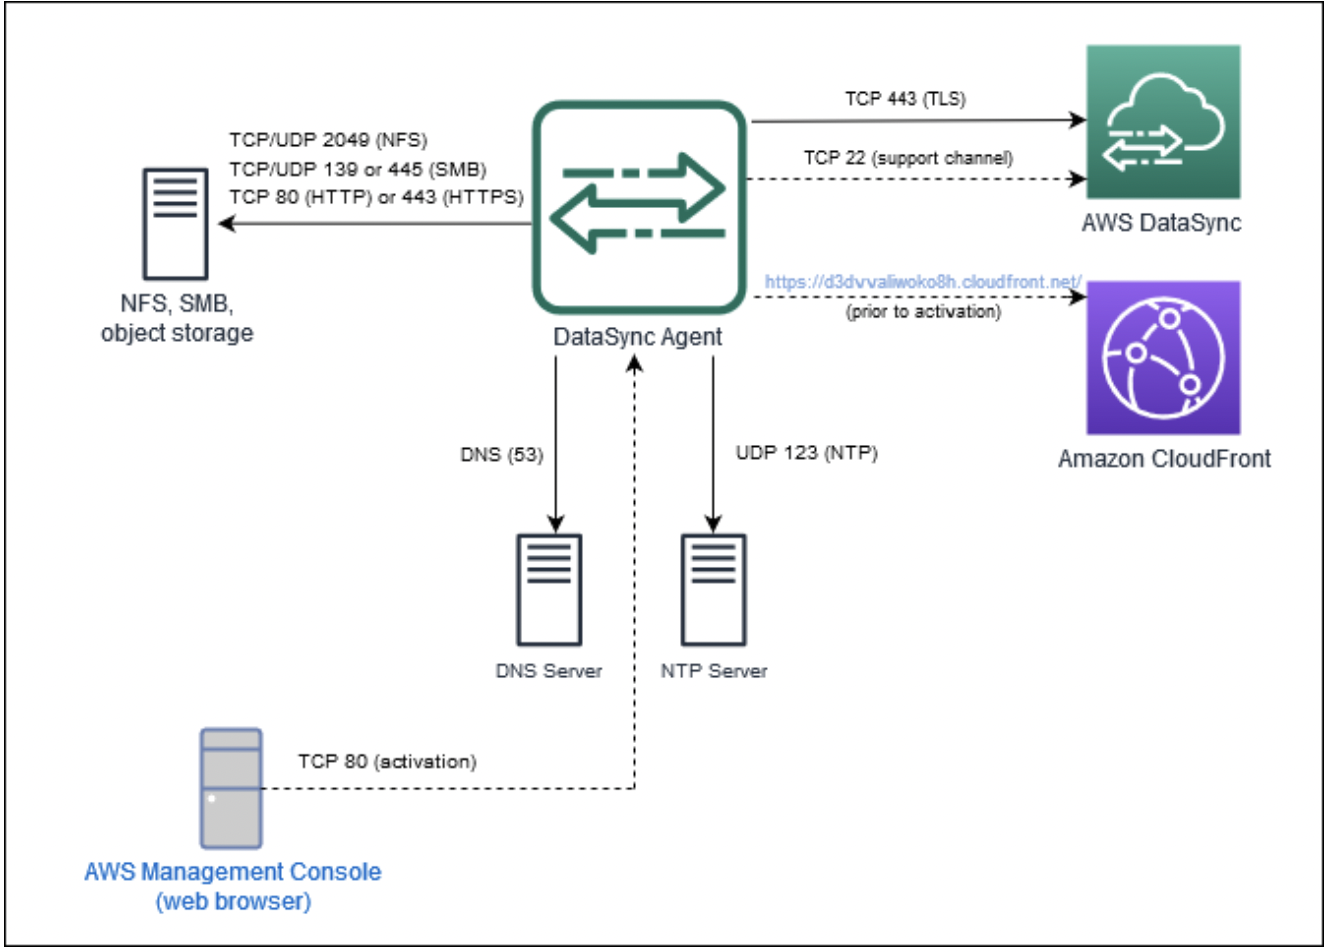
The following ports are required for communication between the DataSync agent and your NFS, Server Message Block (SMB), or Amazon S3 API compatible storage.
|
From |
To |
Protocol |
Port |
How Used |
|---|---|---|---|---|
| Agent |
NFS server |
TCP/UDP |
2049 (NFS) |
By the DataSync agent to mount a source NFS file system. Supports NFS v3.x, NFS v4.0, and NFS v4.1. |
| Agent |
SMB server |
TCP/UDP |
139 (SMB) or 445 (SMB) |
By the DataSync agent to mount a source SMB file share. Supports SMB 2.1 and SMB 3 versions. |
| Agent |
Self-managed object storage |
TCP |
443 (HTTPS) or 80 (HTTP) |
By the DataSync agent to access your self-managed object storage. |
Network Requirements When Using Public Service Endpoints or FIPS Endpoints
Your agent VM requires access to the following endpoints to communicate with AWS when using public service endpoints, or when using FIPS endpoints. Enabling this access is not necessary when using DataSync with VPC endpoints.
If you use a firewall or router to filter or limit network traffic, configure your firewall or router to allow these service endpoints. They're required to enable outbound communication between your network and AWS.
|
From |
To |
Protocol |
Port |
How Used |
Endpoints Accessed by the Agent |
|---|---|---|---|---|---|
|
Your web browser |
DataSync agent |
TCP |
80 (HTTP) |
Used by your computer to obtain the agent activation key. After successful activation, DataSync closes the agent's port 80. The DataSync agent doesn't require port 80 to be publicly accessible. The required level of access to port 80 depends on your network configuration. |
|
| Agent | AWS | TCP |
443 (HTTPS) |
Used by the DataSync agent to activate with your AWS account. This is for agent activation only. You can block the endpoints after activation. |
For public endpoint activation: activation.datasync.$
For FIPS endpoint activation: activation.datasync-fips.$
|
|
Agent |
AWS |
TCP |
443 (HTTPS) |
For communication between the DataSync agent and the AWS service endpoint. For information about Regions and service endpoints, see Choose a Service Endpoint. |
API endpoints: datasync.$region.amazonaws.com Data transfer endpoints:
Data transfer endpoints for FIPS: cp.datasync-fips.$
Agent updates: repo. |
|
Agent |
Domain Name Service (DNS) server |
TCP/UDP |
53 (DNS) |
For communication between DataSync agent and the DNS server. |
|
|
Agent |
AWS |
TCP |
22 (Support channel) |
Allows AWS Support to access your DataSync to help you with troubleshooting DataSync issues. You don't need this port open for normal operation, but it is required for troubleshooting. |
Support channel 54.201.223.107 |
| Agent |
NTP server |
UDP |
123 (NTP) |
Used by local systems to synchronize VM time to the host time. |
NTP 0.amazon.pool.ntp.org
1.amazon.pool.ntp.org
2.amazon.pool.ntp.org
3.amazon.pool.ntp.org
Note
If you want to change the default NTP configuration of your VM agent to use a different NTP server using the local console, see Configuring a Network Time Protocol (NTP) Server. |
The following illustration provides an overview of the ports required by DataSync:
Gettings Setup
Download the DataSync Agent OVA template
As a first step, download the VMware OVA for the AWS DataSync Agent:
Download: AWS DataSync Agent VMWare
Deploy the DataSync Agent (VMware ESXi Hypervisor)
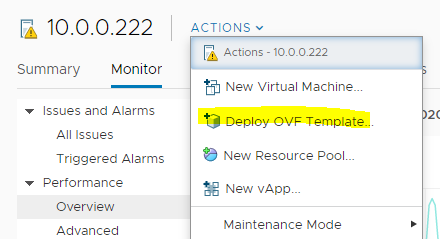
Select "Deploy OVF Template" to deploy the image on the host:
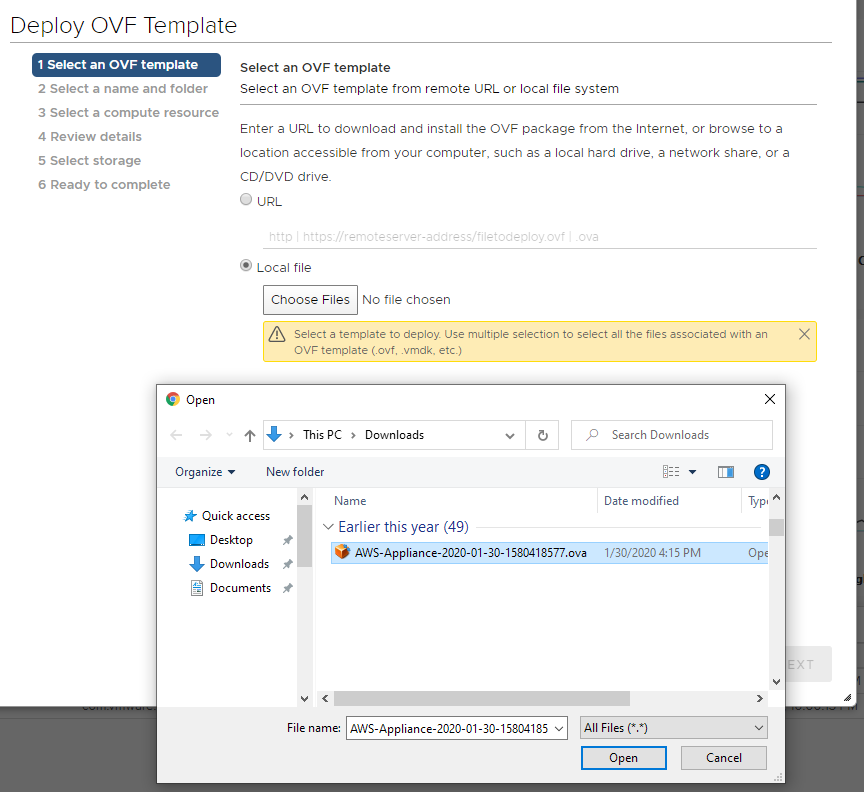
Select "Local file" and browse to the image you downloaded previously.
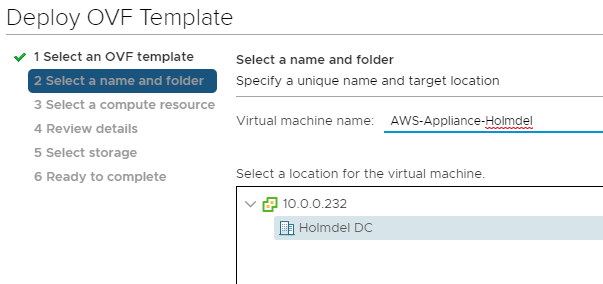
Select a name for the virtual machine:
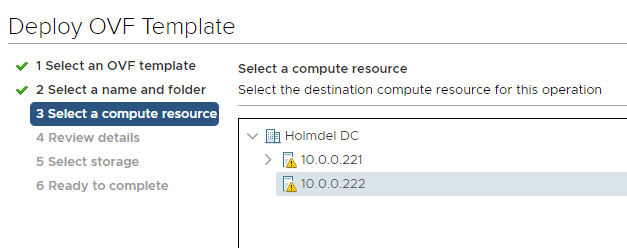
Select the compute resource that should be used for the template:
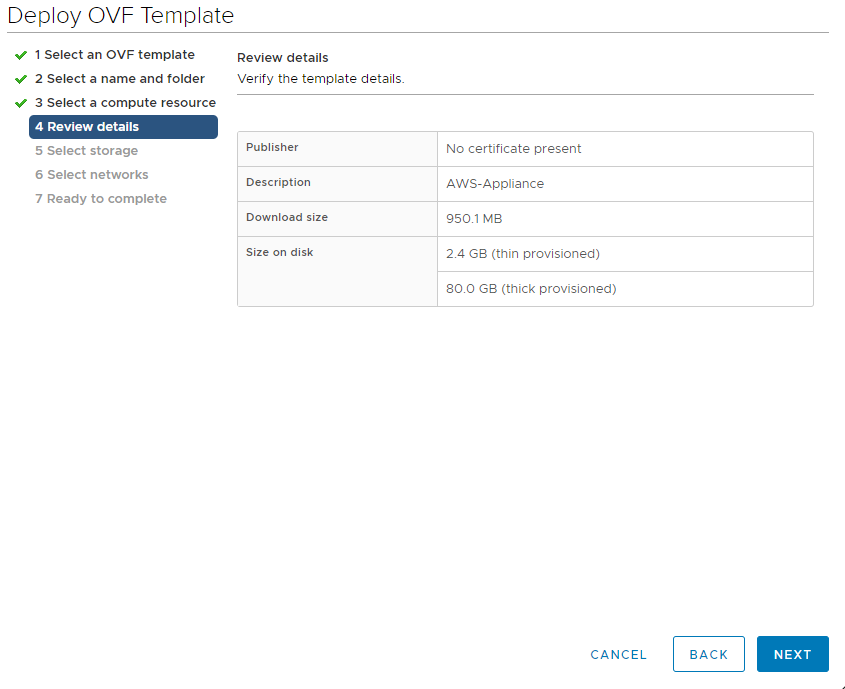
Review details and ensure that all is correct:
Select the storage volume that should be used by the VM:

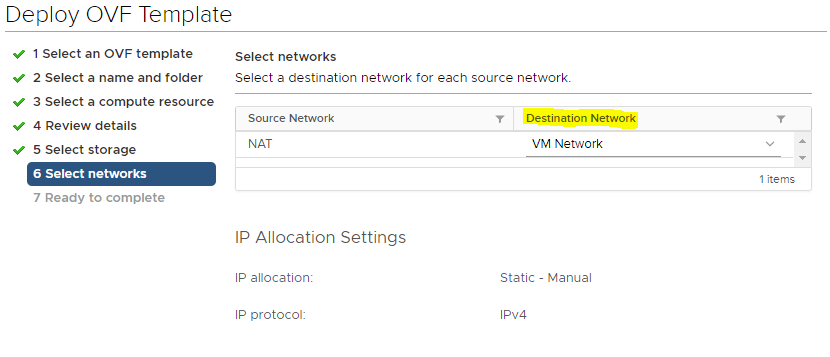
Select the networks that should be used by the VM:
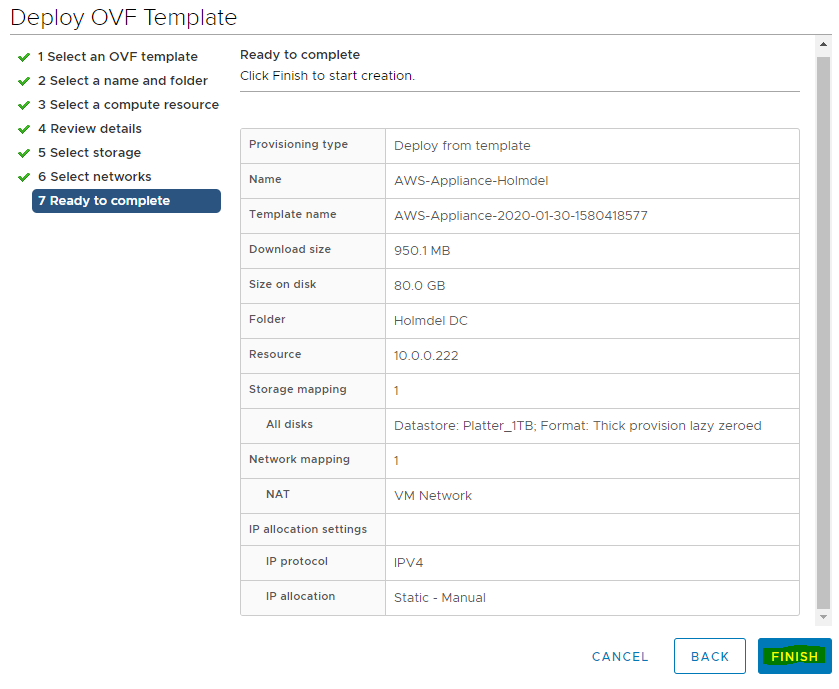
Ensure that all information is correct, and select "Finish" to deploy template:
Confirm successful import (using Recent Tasks):

Complete Network Configuration
Start the VM, and afterwards login to the DataSync console:
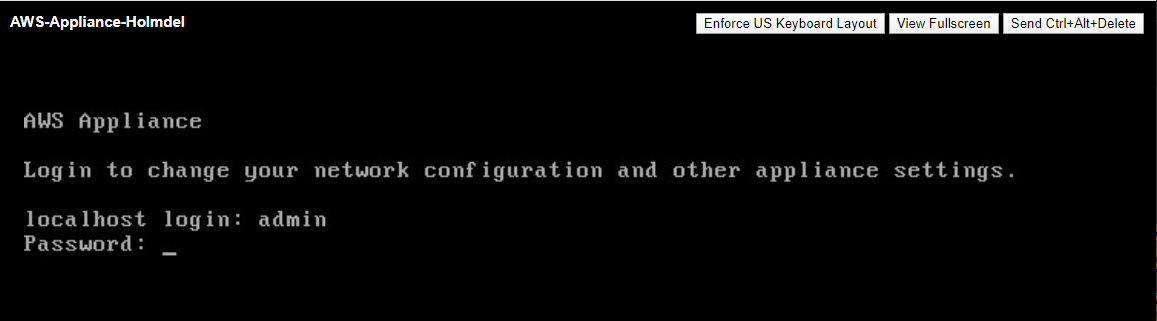
Default credentials:
login: admin
password: password
Select "Network Configuration" to configure the IP address of the DataSync Agent
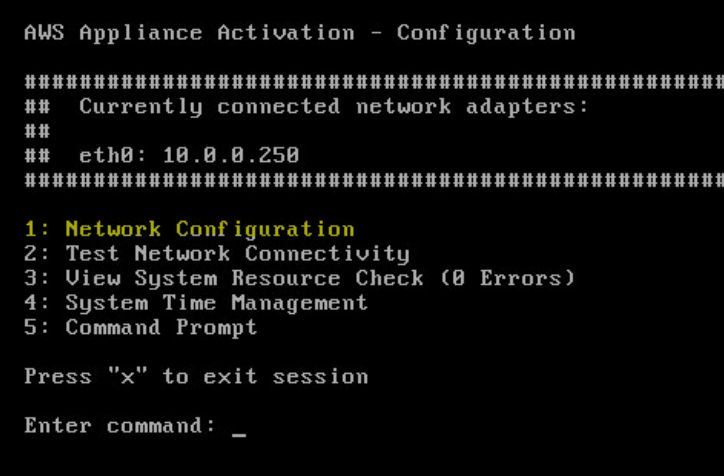
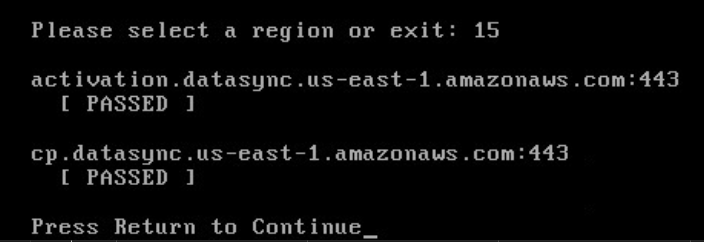
Test successful network connectivity by selecting "Test Network Connectivity":

Final Steps
Congratulations! You've successfully deployed the DataSync Agent. 🎉
To connect this virtual appliance to Nuclei infrastructure, we will need the activation key. This should be option 0 from the main menu.
Be aware that there is a 30 minute timer for the activation key so we need to make sure the handover is coordinated.
As a final step, you will need to share the path and credentials to your network share with Nuclei. This is the share in your environment where the recordings have been exported to.
Once provided, Nuclei will complete the configuration of the appliance to facilitate transfer of data from your local network share to Nuclei's Amazon S3 resources:
Need Help?
We're here! Please contact support@nuclei.ai if you find you need help deploying the AWS DataSync Agent.
Many thanks!! ✌️
Comments
0 comments
Article is closed for comments.